The ease with which we can move files from our phones to the Web is remarkable. The specialized knowledge and software that was required to put something on a website just a few years ago has been replaced with just a couple of taps. The trouble with this streamlined approach to uploading photos, though, is that it sometimes introduces inefficiencies down the line. Take image file sizes, for example.
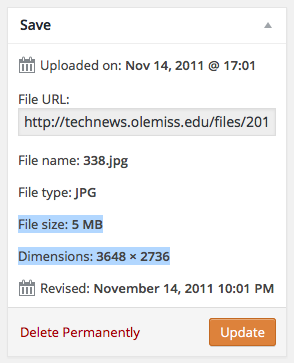
This image is 5 MB in size with dimensions that are larger than most screens can even display.
Standard digital cameras today are capable of creating images with anywhere from 5- to 20-megapixel resolutions. The raw images are very nice and crisp looking, but the files can be 10 MB or larger. (That’s a lot!) While you need that amount of detail for printable photos, most of it is wasted on computer screens. Most images on the Web are meant to be displayed at no more than the width of the browser. But raw photos from a good camera can make images much larger than the display can even show. For reference, the large images on the main UM homepage are around 250 kB–that’s just a quarter of a megabyte.
The “list view” icon is on the left in the Media Library. “Grid view” is on the right.
Sites that are hosted on WordPress often suffer from this problem. If you’re running out of space, have a look in your Media Library. Choose the List View icon and then sort your files by size in descending order (clicking Space Used twice usually gets it). That should put the largest files at the top. If these are images, let me show you a method of freeing up a lot of space. It isn’t easy, but it’s better than running out of room.
First, “Edit” the image. The edit screen gives you a version of the image that has automatically been sized to fit. WordPress actually saves multiple copies of images for different purposes, so don’t be fooled by this. Instead, look at the information on the right and note the file size and dimensions. (See screenshot above.) Now go back a page and choose “View” on that image to see its placeholder page. Click the thumbnail to see how large it really is. On the example I’m using, I can only see part of the image because it won’t fit on the screen. Right-click this to download a copy of it.
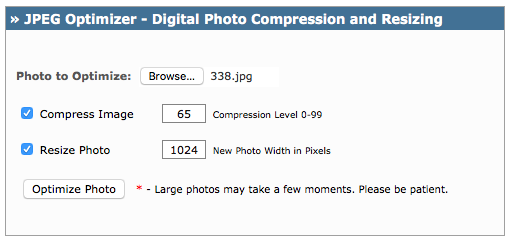
I’ve recently found a great little free application called JPEG Optimizer that will shrink and compress JPEG files. Open a new browser tab and go to JPEG Optimizer. Then browse for the photo you just saved to your computer so you can optimize it. I used the default compression level, but I changed the width of my image to 1024 pixels. If you know exactly how big your photo needs to be, use that width instead. Then select Optimize Photo and let it churn for a few seconds.
Once that finishes, it should show you a new version of your photo that has been optimized. 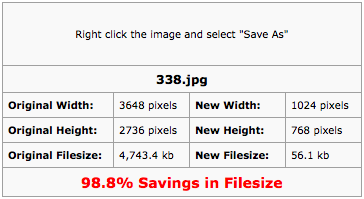 You should see significant savings in the file size, often surpassing the default 65% compression level. But the image itself should look pretty much the way it did before. Follow the instructions to right-click the image and save it to your computer. You may either save it with the same file name or give it a new one. It won’t matter in the next steps.
Now that you have your optimized photo on your computer, you need to get it uploaded into your site. 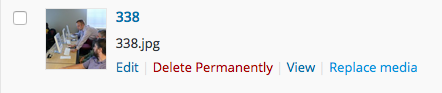 Go back to the tab where your Media Library is open, locate the image you are working with and select “Replace media” for it. You’ll be warned that you are replacing the file with no means of undoing this action. Be empowered and do it!
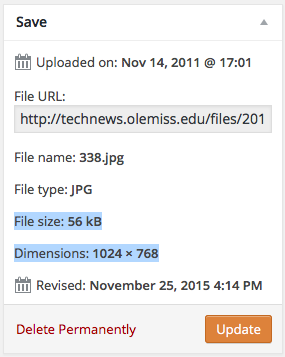
The optimized image has replaced the previously bloated one. Note the file size and dimensions are more in line with what is needed for Web display.
And that’s it. If you’d like to see what a good job you’ve done, choose to “Edit” that image and see the changes to the file size and dimensions.
If you’d like to pare down your Media Library a little more, look in the Uploaded To column for any files that are unattached. These have been uploaded by aren’t being used on any page on your site. These will sometimes include multiple copies of a photo or file that got uploaded by accident. If you are sure you don’t need them, go ahead and delete them.
Even if you aren’t using WordPress, that JPEG Optimizer is a pretty helpful tool. I’ve been doing this kind of work in Photoshop for years, and I still use it for cropping and other detailed work. But I appreciate the ease with which the JPEG Optimizer does this one thing that can make a huge impact.
Images are usually the most space-consuming parts of your website. You can save many, many megabytes by optimizing your image files before uploaded, or at least by replacing them with optimized versions now that you know how. The Internet will thank you.
Tags: images, jpeg, jpg, website, wordpress